Dealing with a dead garden light circuit, an unresponsive irrigation solenoid valve, or a non-functioning sub-pump often points to the same culprit: a break in a wire underground. Unlike above-ground wiring, subterranean faults are concealed by earth, concrete, and conduits, making them notoriously challenging to locate. Pinpointing the exact location of the break is crucial to minimizing excavation, saving time, and preserving landscaping.
how to find a break in a wire underground
If you are asking, 'How to find a break in an underground wire?,' this guide details the professional methods and specialized tools required to track that invisible fault line accurately, turning a difficult repair into a manageable project.
1. Safety Protocols and Preliminary Diagnosis
Before introducing any specialized tools, prioritize safety and gather essential diagnostic information.
A. Prioritize Safety and De-Energize
-
Shut Off Power: Locate the circuit breaker controlling the underground wire and turn it OFF. For low-voltage systems (like landscape lighting or irrigation), disconnect the power supply at the transformer or controller.
-
Verify Zero Voltage: Use a broken wire detector (like a non-contact voltage tester) or multimeter to confirm the circuit is completely de-energized.
B. Map and Test for Continuity
-
Map the Route: Accurately sketch or remember the path the wire takes from its source (e.g., control panel or junction box) to its termination point. Knowing the route is the first step to efficiently finding a break in underground wire.
-
Test the Circuit: Use a multimeter or a simple broken wire tester to perform a continuity test on the wire at both the source and termination points.
-
No Continuity (Open Loop): If the meter reads infinite resistance (OL), the wire is severed (open circuit). This is the fault you are primarily looking for.
-
Low Resistance/Short: If the meter reads very low resistance, the wire may be shorted to the ground or another conductor (a short circuit). While a different fault, it also requires location and repair.
-
2. Essential Tools: The Underground Wire Locator Arsenal
Since you cannot visually inspect the wire, you must rely on tools that inject a traceable signal into the wire. These are the core components of a successful underground wire locator strategy.
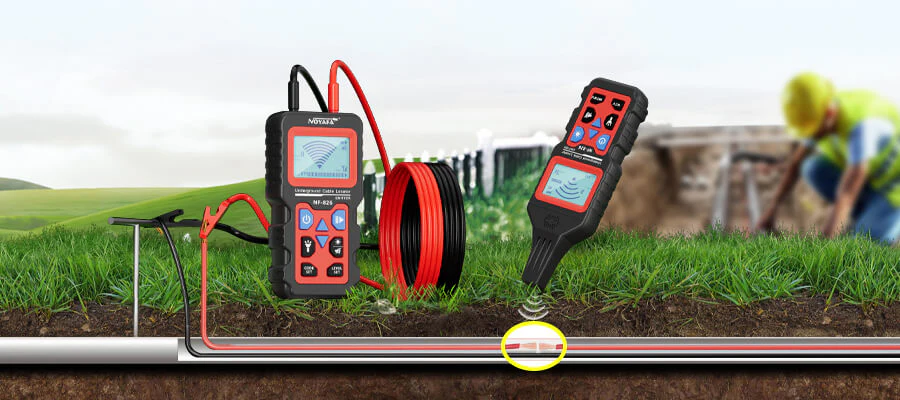
The Wire Tracer (Tone Generator and Receiver)
This is the most effective and affordable non-destructive method for pinpointing the exact location of the break. The system consists of two parts: a transmitter (tone generator) and a receiver (wand).
Time Domain Reflectometer (TDR)
A TDR is a more advanced device used by professionals for precision location, especially on long commercial or industrial cable runs. It measures the time it takes for an electrical pulse to hit the break and reflect back, calculating the exact distance to the fault.
3. Technique A: The Wire Tracer (Tone Generator Method)
The tone generator method is the definitive technique for finding a break in an underground electrical wire.
-
Connect the Transmitter: Connect the wire tracer's transmitter unit to the faulty wire. For a simple open circuit (break), connect one terminal of the transmitter to the wire you want to trace and the other terminal to a known good ground (e.g., a grounding rod or another unused wire in the same conduit). The transmitter injects a distinct electrical signal (tone) into the wire.
-
Trace the Signal: Walk the entire suspected route of the wire, holding the receiver wand near the ground surface. The receiver is designed to pick up the electromagnetic field generated by the signal flowing through the buried wire. The tone will be loudest when the wand is held directly over the path of the wire.
-
Pinpoint the Break: As you pass over the break point, the injected signal can no longer flow forward. Consequently, the tone or signal strength on the receiver will suddenly stop or drop dramatically. This abrupt loss of signal accurately pinpoints the location of the severance. Mark this spot with spray paint or a flag.
4. Specialized Applications: Dog Fence and Low-Voltage Wire
Low-voltage wires, such as those used for electric dog fences or landscape lighting, often require a similar but sometimes simpler technique:
-
How to Find a Break in an Electric Dog Fence: Dog fence systems use boundary wires that form a closed loop. The transmitter box itself often has indicator lights that change when the loop is broken. To locate the fault, you can use the same tone generator technique: disconnect the fence wires from the transmitter and connect the tone generator instead. Follow the perimeter until the receiver signal stops.
-
Irrigation Wires: Faults in control wires leading to irrigation valves are often caused by corrosion near splices. The wire tracer method is ideal for isolating which wire has the break and where along the route the problem lies.
5. Repair Protocol: Localizing and Protecting the Fix
Once you have successfully used your underground wire locator to pinpoint the break, minimal excavation is necessary.
-
Verify the Location: Dig slowly and carefully at the marked spot to expose the wire.
-
Identify Damage: Determine the cause (e.g., root intrusion, abrasion, or a shovel strike).
-
Perform the Repair: Cut out the damaged section of the wire. Splice the broken ends using the correct type of connector:
-
Low Voltage: Use grease-filled, waterproof wire nuts or purpose-built low-voltage splicing kits.
-
High Voltage: Use a professional-grade resin-filled splice kit to ensure the connection is completely sealed and safe, meeting local electrical codes for burial.
-
-
Backfill: Once the repair is tested and confirmed functional, place the splice inside a protective conduit or ensure the waterproof seal is absolute before carefully backfilling the trench.
By methodically applying these techniques and relying on a quality wire locator tool, you transform the challenging task of finding break in underground wire into a precise, manageable repair.


