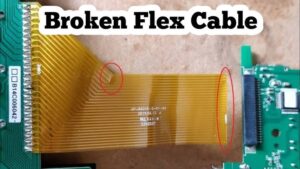
LCD screens in smartphones, laptops, and other electronics rely on flex cables or ribbon cables to connect the display to the mainboard. Over time, these delicate cables can get damaged due to bending, pressure, or mishandling.
Repair or Replace an LCD Flex Cable
In this guide, we’ll explain:
How to identify a faulty LCD ribbon cable
Whether it can be repaired or should be replaced
Step-by-step replacement process
Safety tips for DIY users
📌 What Is an LCD Flex/Ribbon Cable?
Flex cable (FFC/FPC): Flat, thin, bendable connector usually found in modern compact electronics.
Ribbon cable: Flat multi-wire connector, used in some laptops, monitors, and industrial LCDs.
Both serve the same purpose: carrying video, power, and sometimes touch signals between the motherboard and the screen.
⚠️ Signs of a Faulty LCD Ribbon Cable
Screen flickering or lines appearing
No display even though the device powers on
Colors distorted or inverted
Screen responds when cable is moved/pressed
Intermittent display connection
If you experience these, the ribbon cable is often the culprit.
🔧 Repair vs Replacement
Repair:
Only possible for very minor issues (loose connectors, dirt, or oxidation).
Can sometimes be fixed by cleaning contacts with isopropyl alcohol.
Broken internal traces are nearly impossible to repair at home.
Replacement (Recommended):
Most reliable solution.
LCD ribbon cables are inexpensive but require careful handling.
Often sold together with replacement LCD kits.
🪛 Step-by-Step: How to Replace an LCD Ribbon Cable
⚠️ Disclaimer: This is a DIY guide for informational purposes. If your device is under warranty, seek professional repair. Proceed carefully.
Power Off & Disconnect Battery
Always turn off your device and disconnect power before starting.
Disassemble Device Housing
Use the proper screwdrivers or opening tools to avoid damage.
For smartphones/laptops, gently separate the screen assembly.
Locate the Ribbon/Flex Cable
It usually connects the LCD panel to the motherboard via a ZIF (Zero Insertion Force) connector.
Unlock the Connector
Use a plastic spudger to lift the connector latch (never use metal tools).
Gently slide out the ribbon cable.
Install the New Cable
Align the new ribbon cable with the connector.
Carefully insert it and lock the latch back in place.
Reassemble & Test
Put the device back together.
Reconnect the battery and power it on to test the display.
🛡 Safety Tips
Work on a clean, static-free surface.
Avoid touching cable contacts with your fingers.
Do not bend the new ribbon cable sharply—it may break.
Take photos during disassembly to help during reassembly.
✅ Conclusion
A damaged LCD ribbon cable can cause screen flickering, no display, or strange colors. While minor issues may be cleaned or adjusted, in most cases, replacement is the safest and most effective repair.
With the right tools and patience, you can replace an LCD flex cable at home. For beginners or expensive devices, however, professional repair services are recommended.
👉 Learn more about cable types in our Flex Cable Ultimate Guide