When setting up an audio system, one of the most common yet overlooked challenges is properly identifying and connecting speaker wires. Understanding the speaker wire color code is crucial to ensuring correct polarity, optimal sound quality, and the long-term reliability of your speakers and amplifier. In this guide, we'll break down the standard color codes, common variations, and practical wiring tips to make your setup hassle-free.
Why Speaker Wire Color Code Matters
Correct wiring ensures that your speakers are in phase with each other. If you reverse polarity—connecting the positive terminal of the amplifier to the negative terminal of the speaker—you may experience:
Weak or muffled sound
Poor bass response
Distorted stereo imaging
That’s why knowing the speaker wire color code helps prevent wiring mistakes and guarantees optimal audio performance.
speaker wire color code
Standard Speaker Wire Color Codes
There is no strict universal standard for speaker wire colors like there is for electrical wiring, but there are widely accepted conventions.
Common 2-Wire Speaker Cable Color Codes
| Wire Color | Function |
|---|---|
| Red | Positive (+) |
| Black | Negative (–) |
| White | Positive (+) (alternative) |
| Green | Negative (–) (alternative) |
| Clear Jacket with Stripe | Negative (–) |
| Clear Jacket without Stripe | Positive (+) |
Color Codes in Multi-Channel Speaker Systems
For home theaters or car audio systems with multiple speakers, manufacturers often use color-coded wires to distinguish between channels:
| Color | Speaker Channel |
|---|---|
| White | Front Left (+) |
| White/Black | Front Left (–) |
| Gray | Front Right (+) |
| Gray/Black | Front Right (–) |
| Green | Rear Left (+) |
| Green/Black | Rear Left (–) |
| Purple | Rear Right (+) |
| Purple/Black | Rear Right (–) |
🔧 Tip: When in doubt, follow the manufacturer’s manual or test the wires using a polarity tester or 9V battery (for quick speaker cone movement testing).
Speaker Wire Polarity: How to Check
1. Visual Identification
Look for color differences or stripes/ridges on one side of the cable.
In clear or translucent wires, one side often has a printed text or ribbed texture indicating polarity.
2. Use a Multimeter
Set the multimeter to continuity mode.
Test wire ends to see which color or side connects to which speaker terminal.
3. 9V Battery Test
Briefly connect a 9V battery to the speaker wire.
If the speaker cone moves outward, the polarity is correct.
If it moves inward, the polarity is reversed.
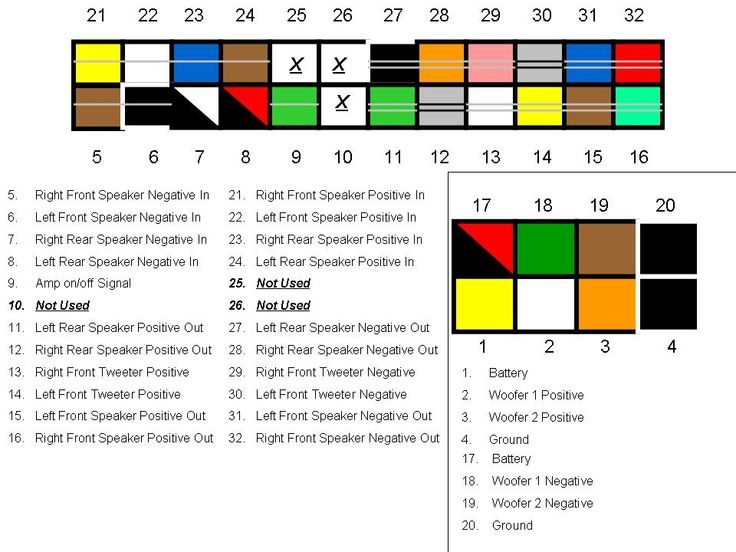
Speaker Wire Color Code in Car Audio Systems
Car manufacturers often follow a different speaker wire color code for factory-installed audio systems. These codes vary by brand, but here’s a general example:
| Color | Speaker Position |
|---|---|
| Green/Black | Rear Left (–) |
| Green | Rear Left (+) |
| Purple/Black | Rear Right (–) |
| Purple | Rear Right (+) |
| White/Black | Front Left (–) |
| White | Front Left (+) |
| Gray/Black | Front Right (–) |
| Gray | Front Right (+) |
📌 Note: Refer to your vehicle’s wiring diagram for exact specifications.
Tips for Proper Speaker Wire Installation
Label your wires before disconnecting or installing a system.
Use banana plugs or spade connectors for secure and clean connections.
Avoid crossing power and speaker wires to reduce signal interference.
Choose proper wire gauge (16 AWG or thicker for longer distances).
Conclusion
Understanding the speaker wire color code helps simplify your audio system setup, ensures accurate polarity, and improves your listening experience. Whether you're working on a home theater, a stereo system, or a car audio upgrade, correctly identifying and connecting your wires can make all the difference.