When you need to control a single light from three or more different locations, a 4-way switch system is what you need. This setup is common in large homes, staircases with landings, hallways with multiple entry points, or open-plan living areas. Though more complex than 3-way switching, wiring a 4-way switch can be straightforward once you understand how it works.
How to Wire a 4-Way Switch for Multiple Locations
🔎 What Is a 4-Way Switch?
A 4-way switch is used in between two 3-way switches to extend the control of a light or group of lights to more than two locations.
Basic structure:
-
3-way switch at the beginning
-
4-way switch in the middle
-
3-way switch at the end
You can add multiple 4-way switches to control the light from even more locations.
🧠 Electrical Terms You Should Know
-
3-Way Switch: A switch with three terminals (1 common, 2 travelers).
-
4-Way Switch: A switch with four terminals — it flips the current between two pairs of traveler wires.
-
Traveler Wires: Connect all switches in the system.
-
Common Terminal: On 3-way switches — where power or load is connected.
-
Line/Load: Line is incoming power; load goes to the light.
-
Ground: For safety, connected to each switch and metal box.
📦 What You Need to Wire a 4-Way Switch
-
Two 3-way switches
-
One or more 4-way switches (depending on how many control points you need)
-
Electrical boxes
-
14/3 or 12/3 cable (black, red, white, ground)
-
14/4 or 12/4 cable (optional — black, red, white, blue, ground for multiple travelers)
-
Voltage tester
-
Screwdriver, wire stripper
-
XLPE cable or SWA cable (for demanding or outdoor environments)
Tip: For outdoor switch setups or long-distance runs through rough environments, use SWA cable for protection, or XLPE insulated wire for higher temperature resistance.
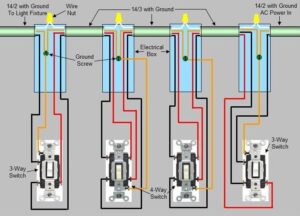
📊 Standard 4-Way Switch Wiring Diagram
Let’s look at a basic 4-way configuration with one 4-way switch between two 3-way switches.
🧱 Cable Between Switches:
-
From first 3-way to 4-way: 14/3 (or 14/4 if preferred)
-
From 4-way to final 3-way: 14/3
🧰 Step-by-Step: How to Wire a 4-Way Switch System
-
Turn off power at the breaker panel.
-
Run the cables:
-
Power source to first 3-way switch
-
Between switches (14/3 or 14/4 cables)
-
Last switch to light fixture
-
-
Wire the first 3-way switch:
-
Hot (line) wire to the common terminal
-
Travelers to the brass terminals
-
-
Wire the 4-way switch:
-
Connect the two traveler wires from the first switch to one pair of terminals
-
Connect the two traveler wires going to the next switch to the other pair
-
-
Wire the final 3-way switch:
-
Travelers to the brass terminals
-
Black wire going to the light (load) to the common terminal
-
-
Connect ground wires throughout
-
Restore power and test the switches.
🛠️ Common Use Cases for 4-Way Switch Systems
-
Large staircases with landings
-
Long corridors with three or more entry points
-
Warehouses or commercial spaces
-
Large living rooms with multiple entrances
In many of these applications, wiring may need to be routed through concrete, outdoors, or exposed locations — making SWA cable a smart choice. Likewise, XLPE cable is ideal for installations in hot or industrial environments where standard insulation may degrade.
💡 Should You Use XLPE or SWA Cable?
| Environment | Recommended Cable |
|---|---|
| Indoors (basic) | 14/3 NM or THHN |
| High-temp areas | XLPE cable |
| Underground / outdoors | SWA cable |
| Commercial / factory | XLPE + SWA combo |
TOT Wire & Cable supplies both XLPE and SWA cables in a wide range of sizes and configurations to match your installation requirements.
📞 Looking for Quality XLPE or SWA Cable?
At TOT Wire & Cable, we specialize in high-performance electrical wire including:
-
Armoured SWA Cable for underground and industrial use
-
XLPE insulated cables for high-heat and demanding conditions
We ship nationwide with fast delivery and competitive pricing.
👉 Contact us today for bulk pricing and specs.


