RCA cables are widely used in home audio, car stereos, and studio equipment to transmit analog audio or video signals. While you can easily buy them, making your own RCA cables gives you control over the length, materials, and build quality — and can even save you money.
how to make rca cables
In this guide, we’ll walk you through how to make RCA cables from scratch with clear instructions and pro tips.
🔍 Why Make Your Own RCA Cables?
-
✅ Custom lengths for cleaner, clutter-free setups
-
✅ Better quality than cheap store-bought cables
-
✅ Savings when building multiple sets
-
✅ Satisfaction of DIY and understanding your audio gear
🧰 What You Need
🔧 Tools:
-
Soldering iron + solder
-
Wire cutters/strippers
-
Heat shrink tubing (optional)
-
Multimeter (for testing)
📦 Materials:
-
RCA connectors (male or female, depending on your need)
-
Shielded audio cable (two-conductor with shielding, e.g. microphone or coax-style cable)
Tip: Use quality connectors made of gold-plated brass or copper for the best signal transfer.
🛠️ Step-by-Step: How to Make RCA Cables
🔹 Step 1: Cut the Cable to Length
-
Measure the length you need and cut the audio cable cleanly using wire cutters.
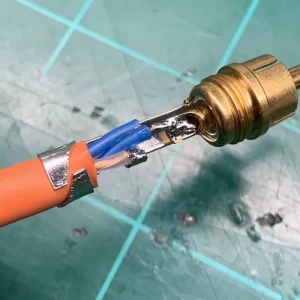
🔹 Step 2: Strip the Cable
-
Strip about 1 inch (2.5 cm) of the outer jacket to expose the shield and internal wires.
-
Separate the braided shield (ground) from the signal wire(s).
-
Strip the insulation from the signal wire, leaving around 1/4 inch exposed.
🔹 Step 3: Prepare the RCA Connector
Most RCA connectors have:
-
A center pin (for signal or 'hot')
-
An outer sleeve or tabs (for ground)
Unscrew the metal sleeve if your connector is two-part.
🔹 Step 4: Solder the Wires
-
Tin the exposed wires with solder (apply a small amount to make soldering easier).
-
Solder the signal wire to the center pin.
-
Solder the shield (ground) to the outer tab or sleeve.
-
Double-check connections to avoid short circuits.
🔹 Step 5: Assemble and Secure
-
Slide on any heat shrink or connector sleeves before soldering, if required.
-
After soldering, slide everything into place and screw the connector shut.
-
Use heat shrink tubing over the joint for insulation and added strain relief.
🔹 Step 6: Test the Cable
Use a multimeter to test for continuity:
-
Tip to tip = continuity
-
Sleeve to sleeve = continuity
-
Tip to sleeve = no continuity (this would mean a short)
📷 Diagram: RCA Cable Wiring
Shielding is crucial to reduce noise or interference, especially for longer cables.
🔁 Balanced vs. Unbalanced RCA?
-
RCA cables are unbalanced: fine for short runs (<10 ft).
-
For longer runs or studio use, consider using XLR or TRS balanced cables.
🧠 Pro Tips
-
Use heat shrink to prevent internal wire movement.
-
Always match cable impedance for video (e.g., 75-ohm coax for RCA video).
-
Label your cables if you’re building multiple sets.
🏁 Conclusion
Now you know exactly how to make RCA cables that are durable, clean, and high-quality. With a little soldering practice and some simple tools, you can customize your audio system without relying on prebuilt cables — and gain the satisfaction of doing it yourself.
Want to make a Y-split RCA cable or RCA to 3.5mm cable next? Let me know and I’ll provide a guide for that too.


