If you're looking to enjoy crystal-clear digital sound from your TV, soundbar, or home theater system, using an optical cable (also known as a digital optical cable or TOSLINK cable) is a great choice. But for many people, figuring out how to connect one can be a little confusing.
how to connect an optical cable
This guide walks you through exactly how to connect an optical audio cable, what to look out for, and common troubleshooting tips.
🎯 What Is an Optical Cable?
An optical cable transmits digital audio signals using light rather than electrical current. This allows for:
-
Higher resistance to electromagnetic interference
-
Support for high-quality surround sound (e.g., Dolby Digital, DTS)
-
Clean, crisp audio for movies, music, and gaming
Common devices with optical ports:
-
TVs
-
Soundbars
-
AV receivers
-
Game consoles
-
Media streamers (e.g., Apple TV, Roku)
-
DVD/Blu-ray players
🧰 What You Need
Before you begin, make sure you have:
-
A digital optical (TOSLINK) cable
-
Devices with optical (SPDIF) ports (usually labeled “OPTICAL IN” or “DIGITAL AUDIO OUT”)
-
Remote controls to access the audio settings on your TV or sound system
🔧 How to Connect an Optical Cable (Step-by-Step)
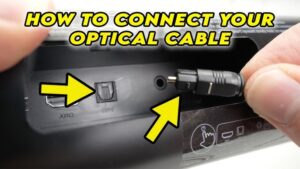
Step 1: Check the Ports
Look for square-shaped optical ports. On a TV, it's usually labeled “Digital Audio Out (Optical)”; on a soundbar or receiver, look for “Optical In”.
💡 Some optical ports have a small flap that gently moves aside when you insert the cable.
Step 2: Remove the Plastic Caps
Most new optical cables come with small protective plastic caps on each end. Gently pull them off before inserting the cable.
Step 3: Connect the Cable
-
Insert one end of the cable into the optical out port on your TV or source device.
-
Insert the other end into the optical in port on your soundbar, speaker, or AV receiver.
-
You’ll feel a slight click or resistance when the connection is secure.
❗ Do not force the cable. It only goes in one way—align the flat and round edges.
Step 4: Change Audio Settings
Go to the audio or sound settings on your TV or source device and:
-
Set Audio Output to “Digital Audio Out”, “Bitstream,” or “PCM”
-
On the receiving device (soundbar/receiver), choose “Optical” or “Digital In” as the input source
✅ Tips for a Successful Connection
-
Use a shorter cable (under 5 meters) if possible, as optical signals can degrade over longer distances.
-
Avoid sharp bends or tight loops in the cable—this can damage the fiber.
-
Ensure devices are powered on, and check that volume is up on both the TV and soundbar.
🔍 Troubleshooting: No Sound?
-
Double-check the optical ports (out from TV → in to soundbar).
-
Confirm Audio Output on your TV is set to Digital/Optical Out.
-
Try switching between PCM and Bitstream settings.
-
Test the cable with another device to rule out damage.
🧠 FAQ
❓ Can I use an optical cable and HDMI at the same time?
Yes, but most devices will only send audio through one output at a time. You’ll need to select which audio output you want in the settings.
❓ Does optical cable carry video?
No. Optical cables only transmit digital audio, not video.
❓ Is optical better than HDMI ARC?
It depends:
-
HDMI ARC supports both audio and video plus newer formats like Dolby Atmos (via eARC).
-
Optical is still great for Dolby Digital or DTS surround sound, and is ideal if your devices don’t support ARC.
📌 Conclusion
Connecting an optical cable is easy once you know what to look for. It's a great way to upgrade your audio without complex wiring. Just plug it into the right ports, tweak your settings, and enjoy clearer sound with minimal interference.


