Steel Wire Armoured (SWA) cable is commonly used in outdoor and underground installations where added protection is needed. When routing electrical power to lights, garden equipment, or outbuildings, connecting armoured cable to a junction box correctly is essential to ensure safety, compliance, and durability.
How to connect armoured cable to junction box
In this guide, we'll walk you through the full process—from preparing the SWA cable to making secure connections inside a junction box—so your installation is both professional and long-lasting.
🔧 Tools and Materials Needed
-
SWA cable (steel wire armoured)
-
Compatible junction box (weatherproof, if outdoors)
-
SWA gland kit (gland, locknut, shroud, banjo earthing tag)
-
Cable cutters / hacksaw
-
Cable stripper or utility knife
-
Adjustable spanner
-
Screwdrivers
-
Earth sleeving
-
Crimp terminals (optional)
-
Waterproof sealing compound (if needed)
-
Drill + hole saw (if junction box doesn’t have pre-punched entry)
⚠️ Safety First
-
Always isolate the power before starting.
-
Use a voltage tester to confirm there is no live current.
-
Follow local electrical codes or regulations (e.g., Part P in the UK).
-
If unsure, consult a qualified electrician.
🧰 Step-by-Step Instructions
1. Select a Suitable Junction Box
Choose a junction box that:
-
Fits the cable size and number of cores
-
Is IP65 or higher rated for outdoor use
-
Has enough room for safe cable bending and termination
-
Allows secure mounting and strain relief
💡 Use plastic or metal adaptable boxes depending on the location.
2. Drill or Knock Out Entry Hole
-
Drill an appropriately sized hole (usually 20mm) using a hole saw or step drill.
-
Deburr the hole if necessary to avoid damaging the cable or gland.
3. Prepare the SWA Cable
-
Cut the cable to the desired length using a hacksaw or cable cutter.
-
Strip approximately 150mm of the outer black PVC sheath to expose the wire armour.
-
Do not cut the steel wires yet.
4. Fit the SWA Gland
-
Slide the gland nut and shroud over the cable.
-
Use a hacksaw to trim the steel wire armour cleanly.
-
Fit the brass gland cone over the wires and screw the gland body onto the cone.
-
Tighten the gland using two spanners to ensure a strong, vibration-resistant fit.
-
Slide on the shroud to seal the connection.
🛡️ The gland acts as both mechanical strain relief and electrical earth bonding.
5. Attach the Gland to the Junction Box
-
Insert the gland through the hole in the box.
-
On the inside, screw on the locknut to secure it.
-
Add the banjo (earthing tag) and tighten it with the nut.
-
Use a short earth wire (fly lead) from the banjo to the junction box's earth terminal or an earth block.
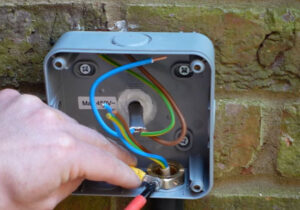
6. Terminate the Inner Cores
-
Strip each inner conductor (live, neutral, and earth) around 10–12mm.
-
Add green/yellow earth sleeving to the bare earth core if required.
-
Terminate the cores into terminal blocks inside the junction box:
-
Brown (or Red) → Live
-
Blue (or Black) → Neutral
-
Bare or G/Y → Earth
-
Use crimp lugs for larger cables or in high-vibration environments.
7. Ensure Waterproof Sealing (if Outdoor)
-
Make sure the cable gland has a proper rubber seal or gland shroud in place.
-
If needed, apply non-hardening sealing compound around the entry point.
-
Confirm that all gaskets or seals inside the box are correctly seated.
✅ Best Practices and Tips
-
Use cable cleats or clips to secure the cable near the junction box.
-
Avoid over-tightening terminal screws to prevent damaging the conductor.
-
Mark cables for identification if multiple circuits are in use.
-
Allow a small drip loop if the cable enters from the top (to prevent water ingress).
❌ Common Mistakes to Avoid
-
Failing to earth the armour correctly
-
Using the wrong size gland for the cable
-
No strain relief—can lead to loose connections over time
-
Incorrect IP rating for outdoor locations
-
Leaving excess steel wire exposed
📌 FAQs
Q: Do I need to earth the steel wire armour?
Yes. The armour must be bonded to earth to provide fault protection.
Q: Can I bury armoured cable directly underground?
Yes, but it's recommended to bury it at a depth of at least 600mm and use warning tape.
Q: Should the junction box be metal or plastic?
Either is fine, but ensure proper earthing for metal boxes and suitable weatherproofing for outdoor use.
🧰 Related Products
-
IP-rated Outdoor Junction Boxes
-
SWA Gland Kits
-
Cable Cleats and Clips
-
Crimp Terminals and Earth Sleeving
✅ Conclusion
Connecting an armoured cable to a junction box isn’t difficult when done with the right materials and care. A properly fitted gland and earth bonding ensure mechanical stability and electrical safety. Whether you’re wiring an outdoor light or powering a garden building, following the correct procedure is essential for a professional result.


