When working on electrical projects, you may need to connect stranded wire to solid wire—a common scenario in residential wiring, automotive fixes, or audio setups. But because these wires behave differently, connecting them properly is important for safety, conductivity, and durability.
how to connect stranded wire to solid wire
In this guide, you’ll learn the best ways to join stranded and solid wire, with methods suitable for both temporary and permanent connections.
🧠 Stranded Wire vs. Solid Wire: What’s the Difference?
-
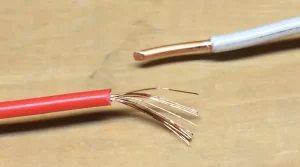
Solid wire: A single, stiff conductor. Common in house wiring and outlets.
-
Stranded wire: Made of many fine strands twisted together. More flexible, often used in appliances, speakers, or automotive wiring.
Because stranded wire is flexible and compressible, and solid wire is stiff, their physical properties make direct connection tricky unless done right.
🛠️ Tools and Materials You Might Need
Depending on your method, gather:
-
Wire strippers
-
Twist-on wire connectors (wire nuts)
-
Terminal blocks or Wago connectors
-
Heat shrink tubing
-
Electrical tape
-
Soldering iron (for advanced/permanent connections)
-
Crimp connectors
🔧 4 Safe and Effective Methods to Connect Stranded to Solid Wire
✅ 1. Wire Nuts (Twist-on Connectors) – Easy and Common
Best for: Indoor wiring, quick fixes
Steps:
-
Strip ¾ inch of insulation from both wires.
-
Align the wires side by side, with the stranded wire slightly twisted.
-
Twist the wire nut clockwise until secure.
-
Tug lightly to test the connection.
-
Wrap with electrical tape for added security (optional).
✅ Pros: Quick, reusable, no special tools
❌ Cons: Not vibration-resistant, bulky in tight spaces
✅ 2. Push-In Connectors (e.g., Wago, lever nuts) – Clean and Reusable
Best for: DIYers, clean installations, low-voltage or light fixtures
Steps:
-
Strip about 10–12 mm (⅜–½ inch) of insulation.
-
Insert each wire into its designated port.
-
Close the lever or verify lock.
✅ Pros: Fast, tool-free, reusable, great for mixed wire types
❌ Cons: Slightly more expensive than wire nuts
✅ 3. Soldering + Heat Shrink Tubing – Most Reliable Permanent Method
Best for: Long-term, vibration-prone environments (e.g., automotive, electronics)
Steps:
-
Strip insulation and slightly twist stranded wire.
-
Wrap the stranded wire around the solid wire.
-
Heat with a soldering iron and apply solder.
-
Slide heat shrink tubing over the joint and heat it until sealed.
✅ Pros: Strong, durable, conductive
❌ Cons: Requires tools and soldering skills, not allowed in some building codes
✅ 4. Crimp Connectors or Butt Splices – Great for Inline Joints
Best for: Automotive, speaker systems, permanent inline connections
Steps:
-
Strip both wires.
-
Insert into each end of a butt splice/crimp connector.
-
Use a crimping tool to compress the connection.
-
Add heat shrink or tape for insulation.
✅ Pros: Vibration-resistant, compact
❌ Cons: Requires crimp tool, not reusable
⚠️ Important Tips
-
Never just twist and tape wires together—this is unsafe and can cause failures or fire hazards.
-
Always check local electrical codes if doing household wiring.
-
Match wire gauges properly for best conductivity.
🧪 Final Testing
After the connection is made, always:
-
Gently pull on both wires to ensure a solid connection
-
Check continuity with a multimeter (if available)
-
Insulate all bare metal properly
📌 Conclusion
Connecting stranded wire to solid wire safely isn’t hard—it just requires the right method for your specific application. Whether you're doing a quick fix with a wire nut or need a vibration-proof solution with soldering, now you know the safest ways to get it done.


1 comment
Igenics 09/15/2025
Hi there everyone, it's my first go to see at this website, and piece of writing is truly fruitful designed for me, keep up posting these types of articles.