Replacing your car's battery cables might seem intimidating, but with the right tools and a little guidance, you can do it yourself. This project can save you money and give you the satisfaction of knowing the job was done right.

car battery cables replacement
This guide provides a detailed, step-by-step tutorial on how to safely replace your car's battery cables.
Safety First
Before you begin, remember this golden rule: Always disconnect the negative (-) cable first and connect it last. This prevents accidental sparks and protects you and your car's electrical system from damage.
Tools and Materials You'll Need
- New Battery Cables: Ensure they are the correct gauge and length for your vehicle.
- Wrenches: A set of ratcheting or combination wrenches to loosen and tighten terminal bolts.
- Wire Brush or Terminal Cleaner: To clean corrosion from the battery posts and terminals.
- Protective Eyewear and Gloves: To protect against acid and debris.
- Baking Soda and Water: A paste for cleaning heavy corrosion.
- Dielectric Grease: To protect terminals from future corrosion.
- Optional (for custom cables):
- Cable Cutters: Heavy-duty cutters for thick battery cable wire.
- Crimping Tool: A hydraulic or heavy-duty manual crimper to attach new terminals.
- Heat Shrink Tubing: To seal and protect the crimped connection.
Step-by-Step Replacement Guide
Step 1: Disconnect the Old Cables
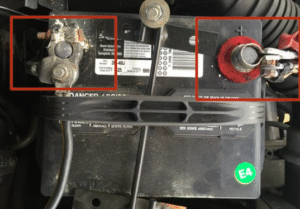
- Locate the negative battery cable (-). It's usually black and connects to the negative terminal (marked with a minus sign).
- Using a wrench, loosen the nut on the negative terminal clamp.
- Twist and pull the clamp off the battery post. Set the cable aside, making sure it doesn't accidentally touch any metal.
- Repeat the process for the positive battery cable (+). This cable is usually red and connects to the positive terminal (marked with a plus sign).
Step 2: Remove the Old Cables
- Follow the path of the old cables from the battery to their connection points (the engine block for the negative cable and the starter or fuse box for the positive cable).
- Using your wrench, unbolt the cables from these connection points.
- Remove the old cables completely from the vehicle.
Step 3: Clean the Battery and Terminals
- Mix baking soda and water to create a paste.
- Scrub the battery posts and cable terminals with a wire brush or terminal cleaner to remove all corrosion.
- Rinse with clean water and dry thoroughly. A clean connection is crucial for good conductivity.
Step 4: Install the New Cables
- Connect the new positive battery cable (+) to its connection point on the starter or fuse box. Ensure the connection is clean and secure.
- Connect the positive clamp to the positive battery post. Push it down firmly and tighten the nut.
- Connect the new negative battery cable (-) to its connection point on the chassis or engine block.
- Connect the negative clamp to the negative battery post. Push it down firmly and tighten the nut.
Step 5: Apply Dielectric Grease
- Apply a thin layer of dielectric grease to the terminals and posts. This will prevent future corrosion and extend the life of your cables.
Final Check
Double-check that all connections are tight and secure. Start your car to confirm the cables are working correctly.
By following these steps, you've not only replaced a key component of your car's electrical system but also gained a deeper understanding of your vehicle.
For more information on choosing the correct battery cable size and other essential tips, check out our comprehensive guide to car battery cables.


